How to create a shared Assembly:
1. Create a DLL or Class library file that will be used - referenced
2. Generate a key file for the assembly
3. Sign the assembly with this key
4. Add signed assembly file to GAC folder
STEP 1: Creating a DLL file or Class Library
Following code is compiled as Class Library project in Visual Studio. Compiled DLL file can be found in "debug" folder of project folder.
namespace  cLib_HardwareStockOperations

{

     //add a base Class for Hardware template///


    public class CL_Hardwares

    {

        public string   hardwareID;


    }


    //add a derived Class to store Notebooks: inherits Hardware Class///


    public class CL_Hardwares_Notebooks : CL_Hardwares

    {

        public string   NotebookID;


    }


    //add another derived Class for Sony Products inherits Notebooks///


    public class CL_Sonys : CL_Hardwares_Notebooks

    {

        public string   modelNo;


    }


}
STEP 2: How to Generate a key file for an assembly
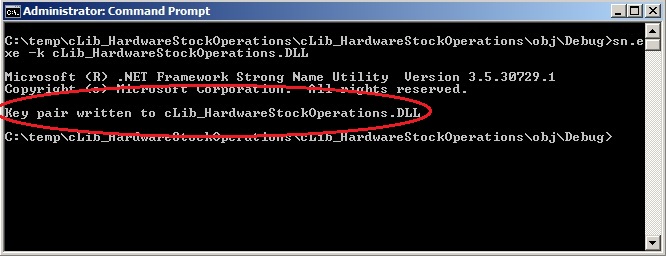
In order to generate a key file for the assembly, Microsoft utility sn.exe is used. To sign a assembly with sn.exe
We generate a key file for the example compiled DLL. It can be found under the debug folder of solution project. If sn.exe is not accessible, it can be required to add the path of sn.exe command prompt.
C:\Program Files\Microsoft SDKs\Windows\v6.0A\Bin
Generating the key file for the DLL assembly.
sn.exe -k cLib_HardwareStockOperations.SNK
"sn.exe" indicates that a key file is created for the assembly.
STEP 3: How to sign an Assembly file:
At step 2, a key file for the assembly had been created. To sign the assembly with the key, open solution project of Class library and open the "AssemblyInfo.cs" file under the node -properties- at solution explorer. Add the following line to the end of "AssemblyInfo.cs" file.
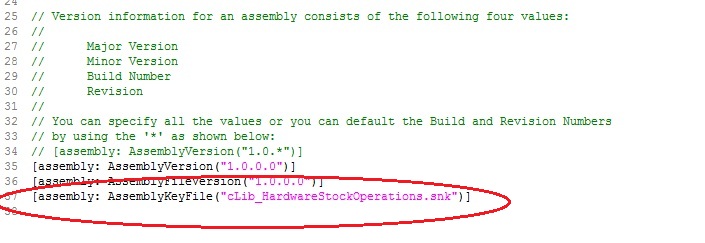
Compile the Class Library solution project to complete signing the assembly.
STEP 4: How to add an assembly file to Global Assembly Cache
At step 3, the assembly file had been signed. To make the assembly accessible for applications, the assembly file is required to be added to the GAC. To add an assembly into GAC, "gacutil.exe" Microsoft utility can be used. Following command line parameter is used for "gacutil.exe" to add assembly into GAC
We add the DLL file that we created and signed at earlier steps into the GAC as follows.
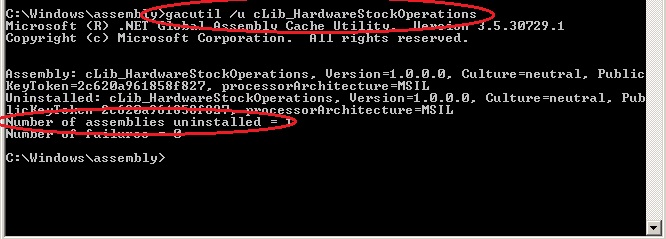
gacutil \i cLib_HardwareStockOperations.DLL
"gacutil.exe" console output indicates that assembly is added to the Global Assembly Cache.
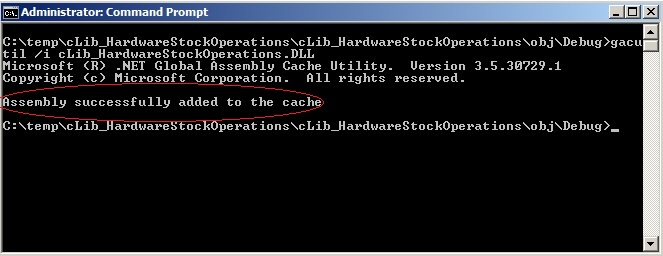
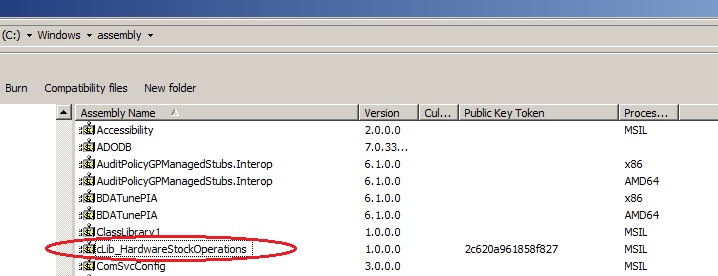
It can be checked from windows explorer in the "assembly" folder of the Windows.
To test shared assembly, we create a console app.
using cLib_HardwareStockOperations;


namespace  ConsoleApplication1

{


    class Program

    {


        static void Main(string [] args)

        {

            //create a Sony notebook object///

            CL_Sonys o_aSonyNotebook = new CL_Sonys();


            //create a Sony notebook object and add model no///

            o_aSonyNotebook.modelNo = "VAIO 22";


            //display modelNo field of Sony object///

            Console.WriteLine("Sony notebook modelNo: " + o_aSonyNotebook.modelNo);


        }

    }

}
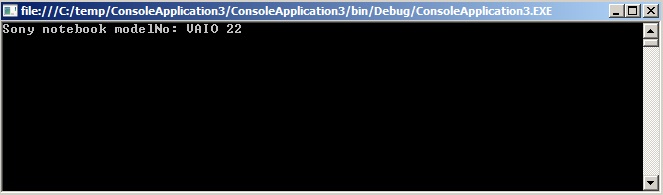
Application output:
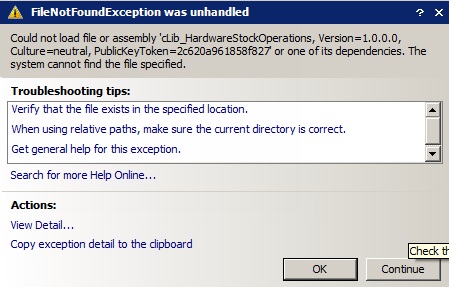
Try to remove DLL file from GAC with following command:
Try to execute the console application again. .NET compiler indicates and ends up with exception.
Could not load file or assembly exception.